Laundry Sink Pump System
ProductOverview
A laundry sink pump system combines a large utility wash basin with an integrated submersible sump pump, automatically lifting dirty water to a floor drain when the sink fills beyond a set level. Common in basements and utility rooms, these fixtures handle washing garden tools, cleaning mops, emptying dehumidifier buckets, and rinsing laundry. The pump eliminates manual bailing and allows the sink to be placed away from floor drains, a major advantage in basements with remote utility corners or elevated floors.
Basin Design and Construction
The Utility Basin is a large, deep wash tub (18–24 inches wide, 12–16 inches deep) fabricated from stainless steel (304 or 316 grade) or fiberglass composite. Stainless steel is more durable and resistant to corrosion from harsh soaps and cleaning chemicals; fiberglass is lighter and lower-cost but more prone to impact damage and staining.
The Basin Rim are rolled or welded to provide structural rigidity and a mounting surface for an optional utility faucet (Utility Faucet). A large Drain Opening (2–3 inches) in the basin bottom accommodates the Basin Drain Assembly assembly or sump connection.
The basin typically sits on adjustable Support Legs made of stainless or epoxy-coated steel, allowing height adjustment and leveling. An optional Trim Panel encloses the sump and pump below for aesthetic finish.
Manual Drain System
For low-volume draining (emptying a bucket, rinsing), the Basin Drain Assembly allows gravity drainage without pump activation. The Drain Ball Valve, a 2–3 inch ball valve mounted through the basin bottom, is opened manually to drain water to a nearby floor drain.
The Lint Strainer is a critical component: a removable basket trap with 150–200 micron mesh that traps lint, hair, and small debris. Without the strainer, lint would clog the pump's impeller passages within weeks. The strainer must be cleaned weekly in busy locations, a simple task of lifting out the basket and flushing it with water.
Automatic Sump Pump System
When the basin fills beyond a threshold (typically 6–8 inches), the Float Level Switch triggers, activating the Submersible Sump Pump. The float is a Float Arm, a buoyant ball on a pivot arm that rises with the water level; when it reaches the setpoint, it mechanically closes electrical contacts.
The Submersible Sump Pump is a submersible centrifugal pump assembly sitting in the sump (the lowest point of the basin). The sealed Pump Motor (1/3–1/2 HP, 115V AC or 12V DC) rotates the Pump Impeller, which pressurizes water through the Pump Housing to the discharge outlet.
Submersible pump motors are sealed units designed to operate while partially or fully submerged. Water cooling keeps the motor from overheating; a thermal overload protector (15–25 amps) shuts down the motor if it runs too hot. Flow rates are typically 30–60 GPM at the basin, depending on the discharge height and resistance of the drain line.
Discharge Plumbing
The Pump Discharge Piping carries water from the pump to the main building drain or sump pit. Flexible vinyl hose (3/4–1 inch diameter) is routed along the wall or floor, secured with J-channel clamps at 2–3 foot intervals to prevent sagging and strain.
A critical component is the Discharge Check Valve, a spring-loaded valve on the discharge line that allows water to flow outward when the pump is running but prevents backflow (siphoning) when the pump stops. Without the check valve, the discharge line would empty back into the sink after each cycle, and sewage from the main drain could siphon upward into the sink, a significant public health hazard.
The discharge line terminates at the main building drain, typically via a sanitary tee or wye fitting that routes water gravity-side-down into the drain stack. Some installations route the discharge line to an external dry well or grade level.
Electrical and Safety
The Laundry Sink Pump System operates from a 25 foot Power Cord with an integrated GFCI (ground fault circuit interrupter) plug, providing protection against electrical shock in the wet basement environment. The cord plugs into a wall-mounted GFCI Outlet (15 amp GFCI receptacle) positioned 4–5 feet above the floor in a Outlet Box with a gasket cover.
GFCI protection is mandatory by electrical code for sinks and basins. The GFCI detects any leakage current (ground faults) and disconnects power within milliseconds, making electrocution essentially impossible.
A manual override switch (if present) allows the user to run the pump on-demand, useful if the float becomes stuck or if manual control is desired. Most modern sinks omit the manual switch, relying entirely on the Float Level Switch sensor.
Maintenance and Operation
Daily/Weekly: Empty and clean the Lint Strainer basket; remove any lint or hair visible in the sump. Monthly: Run the pump with the manual drain closed, allowing it to cycle 3–4 times to clear any sediment; verify that the float arm moves freely without sticking. Annually: Inspect the Discharge Check Valve for mineral deposits or debris; flush the discharge line with water or a plumbing snake to confirm it's not clogged.
Common issues include:
- Pump won't start: Float lever stuck in the down position (manually lift to reset). Check that the GFCI outlet hasn't tripped; press reset button.
- Water level rises in sink without pumping: Float not reaching setpoint (low flow obstruction in sump), or float arm mechanically stuck. Inspect and clear any obstructions.
- Pump runs continuously: Float switch contacts remain closed (stuck at high level). Remove debris around the float ball and test movement.
- Weak discharge: Clogged Pump Discharge Piping, debris in pump impeller, or failing Discharge Check Valve. Clear discharge line with a plumbing snake; inspect check valve for deposits.
Installation Considerations
Installation requires:
- Location: Ideally near a basement floor drain or a suitable outdoor drainage point. The pump can lift water 4–8 feet vertically; discharge line must slope downward at least 1/8 inch per foot to prevent air locks.
- Electrical: A dedicated 15 amp GFCI outlet within reach of the 25 foot power cord.
- Rough plumbing: Connection of the discharge line to the main building drain via a sanitary tee, or outlet to an exterior dry well.
- Floor preparation: Installation on a level, structurally sound basement floor; the sink assembly weighs 150–250 lbs when full.
Installation cost ranges from $400–$1,200 (sink unit alone $300–$600; labor and plumbing $100–$600). Submersible pumps have a typical lifespan of 5–10 years; replacement cost is $200–$400 for the pump module.
Lint Management in the Discharge Line
The Lint Strainer on the basin prevents large lint particles from entering the pump, but very fine lint (clothing fibers, small soap particles) can pass through and accumulate in the Pump Discharge Piping. Over months, a partial clog may develop, reducing flow. Prevention includes:
- Cleaning the strainer basket daily if the sink is used for washing textiles.
- Periodically flushing the discharge line with hot water or running a plumbing auger through it.
- Installing a lint trap or cartridge filter in the sump before the pump intake if high volumes of fine lint are expected.
Laundry Sink Pump System parts and their functions
8 top-level parts · 25 parts in total · full bill of materials below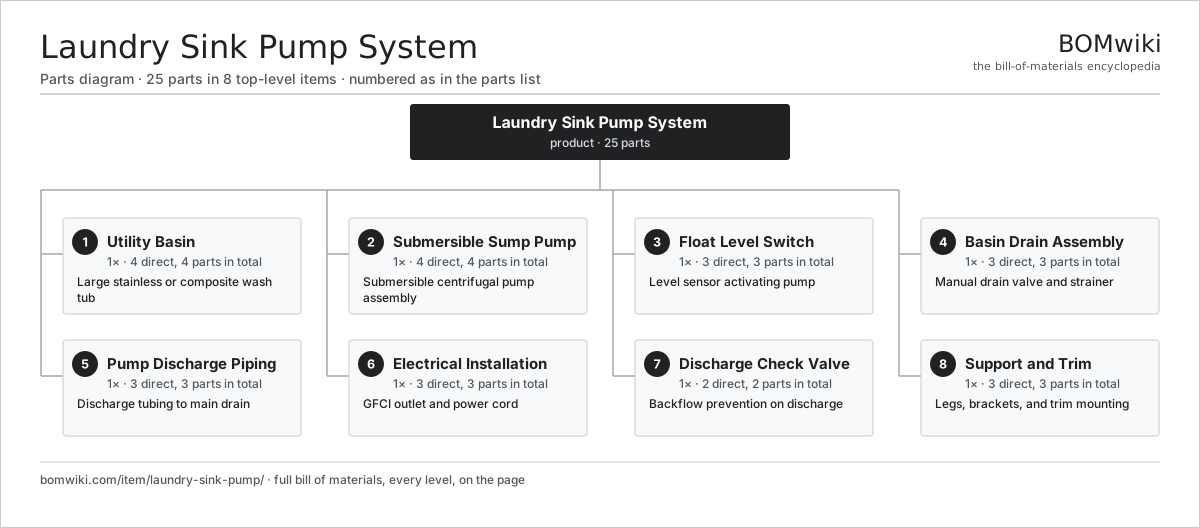
| # | Part | Qty | What it does |
|---|---|---|---|
| 1 | Utility Basin 4 parts | 1× | Large stainless or composite wash tub |
| 2 | Submersible Sump Pump 4 parts | 1× | Submersible centrifugal pump assembly |
| 3 | Float Level Switch 3 parts | 1× | Level sensor activating pump |
| 4 | Basin Drain Assembly 3 parts | 1× | Manual drain valve and strainer |
| 5 | Pump Discharge Piping 3 parts | 1× | Discharge tubing to main drain |
| 6 | Electrical Installation 3 parts | 1× | GFCI outlet and power cord |
| 7 | Discharge Check Valve 2 parts | 1× | Backflow prevention on discharge |
| 8 | Support and Trim 3 parts | 1× | Legs, brackets, and trim mounting |
3D model
No 3D model yet. Have a CAD file of this? Add a 3D model. STL renders right on this page; STEP, FreeCAD, and OpenSCAD sources are welcome too (openly licensed, like all 3D models on BOMwiki).
Build & assembly graph
expand / collapse · shared sub-assemblies converge · links to related products · est. labourTap an assembly to expand/collapse · tap a part to open it · use “Open page” for any node · drag to pan, scroll to zoom.
Bill of materials for Laundry Sink Pump System
8 top-level lines · 33 rows shown · 25 parts total · indented to 3 levels| # | Item / sub-assembly | Part no. | Qty/assy | Ext. qty | Parts | Type |
|---|---|---|---|---|---|---|
| 1 | Utility Basin 4 parts | laundry-sink-pump-basin | 1× | 1 | 4 | assembly |
| 1.1 | Wash Basin | laundry-sink-pump-bowl | 1× | 1 | · | part |
| 1.2 | Basin Rim | laundry-sink-pump-rim-edges | 1× | 1 | · | part |
| 1.3 | Drain Opening | laundry-sink-pump-drain-hole | 1× | 1 | · | part |
| 1.4 | Fastener Set | fastener-set | 1× | 1 | · | part |
| 2 | Submersible Sump Pump 4 parts | laundry-sink-pump-sump-pump | 1× | 1 | 4 | assembly |
| 2.1 | Pump Motor | laundry-sink-pump-motor | 1× | 1 | · | part |
| 2.2 | Pump Impeller | laundry-sink-pump-impeller | 1× | 1 | · | part |
| 2.3 | Pump Housing | laundry-sink-pump-housing | 1× | 1 | · | part |
| 2.4 | Power Cord | laundry-sink-pump-power-cord | 1× | 1 | · | part |
| 3 | Float Level Switch 3 parts | laundry-sink-pump-float-switch | 1× | 1 | 3 | assembly |
| 3.1 | Float Arm | laundry-sink-pump-float-mechanism | 1× | 1 | · | part |
| 3.2 | Switch Contacts | laundry-sink-pump-float-switch-contacts | 1× | 1 | · | part |
| 3.3 | Float Bracket | laundry-sink-pump-float-mounting | 1× | 1 | · | part |
| 4 | Basin Drain Assembly 3 parts | laundry-sink-pump-inlet-drain | 1× | 1 | 3 | assembly |
| 4.1 | Drain Ball Valve | laundry-sink-pump-drain-valve | 1× | 1 | · | part |
| 4.2 | Lint Strainer | laundry-sink-pump-drain-strainer | 1× | 1 | · | part |
| 4.3 | Drain Fitting | laundry-sink-pump-drain-body | 1× | 1 | · | part |
| 5 | Pump Discharge Piping 3 parts | laundry-sink-pump-discharge-line | 1× | 1 | 3 | assembly |
| 5.1 | Discharge Hose | laundry-sink-pump-discharge-tube | 1× | 1 | · | part |
| 5.2 | Discharge Clamps | laundry-sink-pump-discharge-routing | 1× | 1 | · | part |
| 5.3 | Discharge Outlet Fitting | laundry-sink-pump-discharge-fitting | 1× | 1 | · | part |
| 6 | Electrical Installation 3 parts | laundry-sink-pump-electrical | 1× | 1 | 3 | assembly |
| 6.1 | GFCI Outlet | laundry-sink-pump-gfci-outlet | 1× | 1 | · | part |
| 6.2 | Outlet Box | laundry-sink-pump-outlet-box | 1× | 1 | · | part |
| 6.3 | Extension Cord | laundry-sink-pump-extension-cord | 1× | 1 | · | part |
| 7 | Discharge Check Valve 2 parts | laundry-sink-pump-check-valve | 1× | 1 | 2 | assembly |
| 7.1 | Check Valve Body | laundry-sink-pump-check-valve-body | 1× | 1 | · | part |
| 7.2 | Check Poppet | laundry-sink-pump-check-valve-poppet | 1× | 1 | · | part |
| 8 | Support and Trim 3 parts | laundry-sink-pump-support-frame | 1× | 1 | 3 | assembly |
| 8.1 | Support Legs | laundry-sink-pump-legs | 1× | 1 | · | part |
| 8.2 | Trim Panel | laundry-sink-pump-trim-panel | 1× | 1 | · | part |
| 8.3 | Utility Faucet | laundry-sink-pump-faucet-spout | 1× | 1 | · | part |
Something wrong in this list? Report a problem with this BOM.
Sourcing: possible vendors
Browse the supplier directory → Prices, MOQ, and lead times are algorithmic estimates, not quotes, and not claims about these companies. Company mappings are curated by keyword; est. price band $20–$3k. How estimates work| Vendor | HQ | Specialty | MOQ | Lead time |
|---|---|---|---|---|
|
🇺🇸Kohler
kohler.com ↗
|
Kohler, US | Plumbing fixtures | 1,000 units | 6–12 wks |
|
🇯🇵TOTO
toto.com ↗
|
Kitakyushu, JP | Sanitaryware | 1,000 units | 6–12 wks |
|
🇯🇵LIXIL
lixil.com ↗
|
Tokyo, JP | Plumbing (Grohe, American Std) | 1,000 units | 6–12 wks |
|
🇺🇸Moen
moen.com ↗
|
North Olmsted, US | Faucets & fixtures | 1,000 units | 6–12 wks |
|
🇨🇭Geberit
geberit.com ↗
|
Rapperswil, CH | Sanitary systems | 1,000 units | 6–12 wks |
1,261-word article