Shrink Sleeve Labeling Machine
ProductOverview
A shrink sleeve labeling machine applies a tube of printed plastic film over a container, then heats it so the film shrinks tight to the container shape. Unlike a flat label, a sleeve can cover the whole body including the shoulders and the cap, follow a contoured or tapered shape with no wrinkles, and act as a tamper-evident seal across the closure. That is why sleeves are used on energy drinks, dairy bottles, aerosols, and any product where 360-degree graphics or a curved body make flat labels look poor. The machine forms the sleeve from flat film, cuts it to length, drops it over the container, and runs it through a steam tunnel that shrinks it to fit.
Containers move along the Frame and Conveyor from the placing head into the tunnel. Flat printed film is fed from the Film Unwind, opened into a round tube on the Forming Mandrel, cut and dropped by the Cut and Place Head, and shrunk in the Steam Shrink Tunnel fed by the Steam Supply supply. The Drive and Control keeps film, knife, and conveyor in step and the Electrical Cabinet cabinet powers it all.
Feeding the film
The sleeve starts as a reel of flat, pre-seamed, printed film, layflat tube that is folded on itself. The Film Unwind carries two reels on Reel Shaft mandrels so that when one runs out the Splice Table taps the running web onto a fresh reel without stopping the line. A Tension Dancer holds the gentle tension the thin film needs, Feed Roller pairs drive it forward, and an Eye-Mark Sensor sensor reads the printed register mark so every sleeve is cut on the artwork rather than at a random point.
Forming and placing the sleeve
A flat tube has to become a round open sleeve before it can go over a bottle. The Forming Mandrel does this: its tapered Mandrel Body spreads the layflat film into a round shape, and Spread Roller wheels around it pull the film down. The mandrel has no top support, since a container has to pass over it, so a Suspension Ring holds it in place from outside while the Insertion Tip guides the open sleeve onto the container neck. At the bottom the Cut and Place Head uses a Rotary Knife cutting against a hardened Cutting Anvil to shear off one sleeve length on the fly, timed by the Eye-Mark Sensor reading. A Container Sensor confirms a container is present, then Placement Roller wheels eject the cut sleeve down over it.
Shrinking in the steam tunnel
The placed sleeve is still loose, and heat is what makes it fit. The Steam Shrink Tunnel surrounds the container with controlled steam, which heats the film evenly and fast so it pulls in tight to every contour. The Tunnel Body is an insulated stainless chamber, and Steam Manifold headers feed an array of Steam Nozzle jets aimed at different zones, so the shoulder shrinks at a different rate from the straight body and the film does not wrinkle or scorch. A Condensate Tray drains the water steam leaves behind, and an Exhaust Hood hood carries off the spent steam. Even shrink with no distorted print is the whole point of multi-zone nozzle control, and steam does this better than hot air on contoured bottles.
Steam supply and control
Clean dry steam at the right pressure is what makes the tunnel work. The Steam Supply supply takes boiler steam through a Moisture Separator that drops out liquid water, a Pressure Regulator that sets pressure, and a Steam Control Valve that modulates flow, with Steam Trap traps draining condensate and a Pressure Sensor watching the line. The Drive and Control synchronizes film feed, knife, and conveyor through a Line Encoder and a Motion Controller, with the operator setting sleeve length and steam on the Touchscreen HMI. Because steam makes the area wet, the Frame and Conveyor is stainless and the Electrical Cabinet cabinet is sealed to keep moisture off the servo drives.
Use and variants
Shrink sleeve machines suit beverages, dairy, personal care, and aerosols where full-body graphics, contoured bottles, or a tamper band over the cap are needed. The steam tunnel here gives the most even shrink and the best print fidelity, at the cost of a boiler and a wet environment; lower-end machines use a hot-air or infrared tunnel that is drier and simpler but less even on complex shapes. Some lines add a separate tamper-band applicator that places a short sleeve only across the closure, and high-speed versions run several Forming Mandrel stations in parallel. Compared with a Wrap-Around Labeling Machine a sleeve machine costs more to run, since film and steam are dearer than a paper label and cold glue, but no flat label can wrap a tapered bottle or seal a cap the way a shrunk sleeve does.
Shrink Sleeve Labeling Machine parts and their functions
8 top-level parts · 163 parts in total · full bill of materials below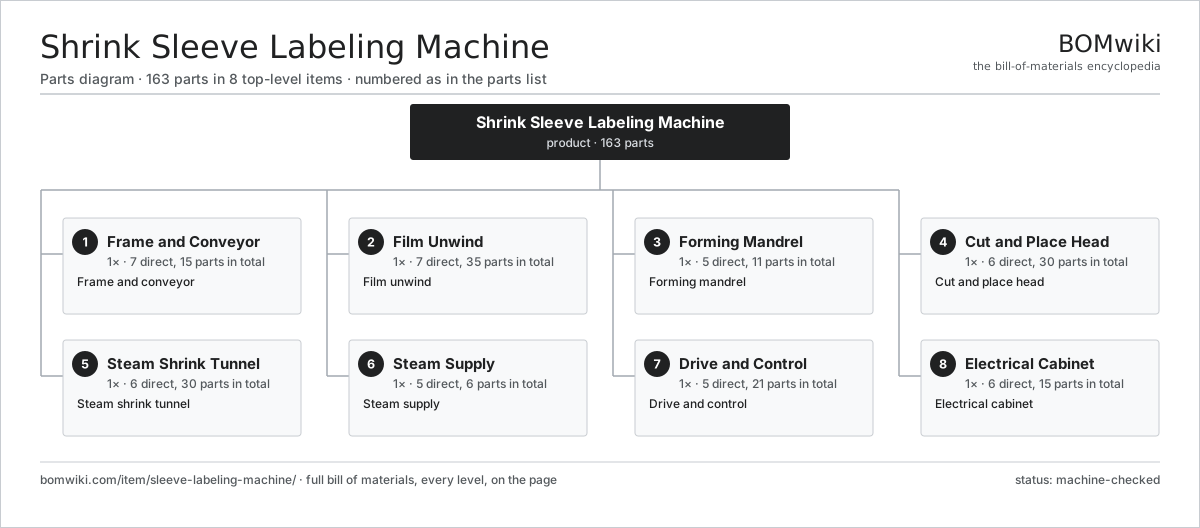
| # | Part | Qty | What it does |
|---|---|---|---|
| 1 | Frame and Conveyor 7 parts | 1× | Frame and conveyor |
| 2 | Film Unwind 7 parts | 1× | Film unwind |
| 3 | Forming Mandrel 5 parts | 1× | Forming mandrel |
| 4 | Cut and Place Head 6 parts | 1× | Cut and place head |
| 5 | Steam Shrink Tunnel 6 parts | 1× | Steam shrink tunnel |
| 6 | Steam Supply 5 parts | 1× | Steam supply |
| 7 | Drive and Control 5 parts | 1× | Drive and control |
| 8 | Electrical Cabinet 6 parts | 1× | Electrical cabinet |
3D model
No 3D model yet. Have a CAD file of this? Add a 3D model. STL renders right on this page; STEP, FreeCAD, and OpenSCAD sources are welcome too (openly licensed, like all 3D models on BOMwiki).
Build & assembly graph
expand / collapse · shared sub-assemblies converge · links to related products · est. labourTap an assembly to expand/collapse · tap a part to open it · use “Open page” for any node · drag to pan, scroll to zoom.
Bill of materials for Shrink Sleeve Labeling Machine
8 top-level lines · 71 rows shown · 163 parts total · indented to 3 levels| # | Item / sub-assembly | Part no. | Qty/assy | Ext. qty | Parts | Type |
|---|---|---|---|---|---|---|
| 1 | Frame and Conveyor 7 parts | sleeve-labeling-machine-frame | 1× | 1 | 15 | assembly |
| 1.1 | Base Frame | sleeve-labeling-machine-base-frame | 1× | 1 | · | part |
| 1.2 | Leveling Leg | sleeve-labeling-machine-leg | 4× | 4 | · | part |
| 1.3 | Slat Chain | sleeve-labeling-machine-conveyor-chain | 1× | 1 | · | part |
| 1.4 | Conveyor Sprocket | sleeve-labeling-machine-sprocket | 2× | 2 | · | part |
| 1.5 | Guide Rail | sleeve-labeling-machine-guide-rail | 2× | 2 | · | part |
| 1.6 | Ball Bearing | ball-bearing | 4× | 4 | · | part |
| 1.7 | Fastener Set | fastener-set | 1× | 1 | · | part |
| 2 | Film Unwind 7 parts | sleeve-labeling-machine-unwind | 1× | 1 | 35 | assembly |
| 2.1 | Reel Shaft | sleeve-labeling-machine-reel-shaft | 2× | 2 | · | part |
| 2.2 | Splice Table | sleeve-labeling-machine-splice-table | 1× | 1 | · | part |
| 2.3 | Tension Dancer | sleeve-labeling-machine-dancer | 1× | 1 | · | part |
| 2.4 | Eye-Mark Sensor | sleeve-labeling-machine-eye-mark | 1× | 1 | · | part |
| 2.5 | Feed Roller | sleeve-labeling-machine-feed-roller | 2× | 2 | · | part |
| 2.6 | Servo Motor 4 parts | servo-motor | 1× | 1 | 24 | assembly |
| 2.6.1 | Stator Assembly 3 parts + deeper › | stator-assembly | 1× | 1 | 3 | assembly |
| 2.6.2 | Rotor Assembly 4 parts + deeper › | rotor-assembly | 1× | 1 | 19 | assembly |
| 2.6.3 | Encoder | encoder | 1× | 1 | · | part |
| 2.6.4 | Motor Housing | motor-housing | 1× | 1 | · | part |
| 2.7 | Ball Bearing | ball-bearing | 4× | 4 | · | part |
| 3 | Forming Mandrel 5 parts | sleeve-labeling-machine-mandrel | 1× | 1 | 11 | assembly |
| 3.1 | Mandrel Body | sleeve-labeling-machine-mandrel-body | 1× | 1 | · | part |
| 3.2 | Suspension Ring | sleeve-labeling-machine-mandrel-magnet | 1× | 1 | · | part |
| 3.3 | Spread Roller | sleeve-labeling-machine-spread-roller | 4× | 4 | · | part |
| 3.4 | Insertion Tip | sleeve-labeling-machine-mandrel-tip | 1× | 1 | · | part |
| 3.5 | Ball Bearing | ball-bearing | 4× | 4 | · | part |
| 4 | Cut and Place Head 6 parts | sleeve-labeling-machine-cutter | 1× | 1 | 30 | assembly |
| 4.1 | Rotary Knife | sleeve-labeling-machine-rotary-knife | 1× | 1 | · | part |
| 4.2 | Cutting Anvil | sleeve-labeling-machine-anvil | 1× | 1 | · | part |
| 4.3 | Placement Roller | sleeve-labeling-machine-place-roller | 2× | 2 | · | part |
| 4.4 | Knife Servo | sleeve-labeling-machine-knife-servo | 1× | 1 | · | part |
| 4.5 | Container Sensor | sleeve-labeling-machine-product-sensor | 1× | 1 | · | part |
| 4.6 | Servo Motor 4 parts | servo-motor | 1× | 1 | 24 | assembly |
| 4.6.1 | Stator Assembly 3 parts + deeper › | stator-assembly | 1× | 1 | 3 | assembly |
| 4.6.2 | Rotor Assembly 4 parts + deeper › | rotor-assembly | 1× | 1 | 19 | assembly |
| 4.6.3 | Encoder | encoder | 1× | 1 | · | part |
| 4.6.4 | Motor Housing | motor-housing | 1× | 1 | · | part |
| 5 | Steam Shrink Tunnel 6 parts | sleeve-labeling-machine-shrink-tunnel | 1× | 1 | 30 | assembly |
| 5.1 | Tunnel Body | sleeve-labeling-machine-tunnel-body | 1× | 1 | · | part |
| 5.2 | Steam Manifold | sleeve-labeling-machine-steam-manifold | 2× | 2 | · | part |
| 5.3 | Steam Nozzle | sleeve-labeling-machine-nozzle | 24× | 24 | · | part |
| 5.4 | Condensate Tray | sleeve-labeling-machine-condensate-tray | 1× | 1 | · | part |
| 5.5 | Exhaust Hood | sleeve-labeling-machine-exhaust | 1× | 1 | · | part |
| 5.6 | Tunnel Conveyor | sleeve-labeling-machine-tunnel-conveyor | 1× | 1 | · | part |
| 6 | Steam Supply 5 parts | sleeve-labeling-machine-steam | 1× | 1 | 6 | assembly |
| 6.1 | Pressure Regulator | sleeve-labeling-machine-steam-regulator | 1× | 1 | · | part |
| 6.2 | Steam Control Valve | sleeve-labeling-machine-steam-valve | 1× | 1 | · | part |
| 6.3 | Steam Trap | sleeve-labeling-machine-steam-trap | 2× | 2 | · | part |
| 6.4 | Moisture Separator | sleeve-labeling-machine-separator | 1× | 1 | · | part |
| 6.5 | Pressure Sensor | pressure-sensor | 1× | 1 | · | part |
| 7 | Drive and Control 5 parts | sleeve-labeling-machine-control | 1× | 1 | 21 | assembly |
| 7.1 | Conveyor Gearmotor | sleeve-labeling-machine-gearmotor | 1× | 1 | · | part |
| 7.2 | Gearbox Housing | gearbox-housing | 1× | 1 | · | part |
| 7.3 | Line Encoder | sleeve-labeling-machine-encoder | 1× | 1 | · | part |
| 7.4 | Touchscreen HMI 3 parts | sleeve-labeling-machine-hmi | 1× | 1 | 3 | assembly |
| 7.4.1 | LCD Panel | lcd-panel | 1× | 1 | · | part |
| 7.4.2 | Bare PCB | pcb-bare | 1× | 1 | · | part |
| 7.4.3 | Microcontroller | mcu | 1× | 1 | · | part |
| 7.5 | Motion Controller 5 parts | sleeve-labeling-machine-plc | 1× | 1 | 15 | assembly |
| 7.5.1 | Bare PCB | pcb-bare | 1× | 1 | · | part |
| 7.5.2 | Microcontroller | mcu | 1× | 1 | · | part |
| 7.5.3 | SMD Passive (R/C/L) | smd-passives | 1× | 1 | · | part |
| 7.5.4 | Relay | relay | 4× | 4 | · | part |
| 7.5.5 | Connector | connector | 8× | 8 | · | part |
| 8 | Electrical Cabinet 6 parts | sleeve-labeling-machine-electrical | 1× | 1 | 15 | assembly |
| 8.1 | Sealed Enclosure | sleeve-labeling-machine-cabinet | 1× | 1 | · | part |
| 8.2 | Power Supply | power-supply | 1× | 1 | · | part |
| 8.3 | Servo Drive | sleeve-labeling-machine-drive-module | 4× | 4 | · | part |
| 8.4 | Emergency Stop | sleeve-labeling-machine-estop | 2× | 2 | · | part |
| 8.5 | Wire Bundle | wire-bundle | 1× | 1 | · | part |
| 8.6 | Connector | connector | 6× | 6 | · | part |
Related products
same domain, ranked by shared parts Automatic Strapping Machine
251 parts · shares 4 with this page
Case Labeling Machine
120 parts · shares 4 with this page
Automatic Strapping Machine
251 parts · shares 4 with this page
Case Labeling Machine
120 parts · shares 4 with this page
 Corrugated Board Production Line
315 parts · shares 4 with this page
Counter-Pressure Filler
519 parts · shares 4 with this page
Film Bundling Machine
437 parts · shares 4 with this page
Corrugated Board Production Line
315 parts · shares 4 with this page
Counter-Pressure Filler
519 parts · shares 4 with this page
Film Bundling Machine
437 parts · shares 4 with this page
 Film Laminating Machine
229 parts · shares 4 with this page
Film Laminating Machine
229 parts · shares 4 with this page
Sourcing: possible vendors
Browse the supplier directory → Prices, MOQ, and lead times are algorithmic estimates, not quotes, and not claims about these companies. Company mappings are curated by keyword; est. price band $10k–$3M. How estimates work| Vendor | HQ | Specialty | MOQ | Lead time |
|---|---|---|---|---|
| heidelberg.com ↗ | Heidelberg, DE | Printing presses | 10 units | 12–22 wks |
|
🇨🇭Bobst
bobst.com ↗
|
Lausanne, CH | Packaging machinery | 10 units | 12–22 wks |
| koenig-bauer.com ↗ | Würzburg, DE | Printing presses | 10 units | 12–22 wks |
| wuh-group.com ↗ | Lengerich, DE | Flexible packaging machines | 10 units | 12–22 wks |
| markandy.com ↗ | Chesterfield, US | Label presses | 10 units | 12–22 wks |
913-word article